Sauces & Condiments
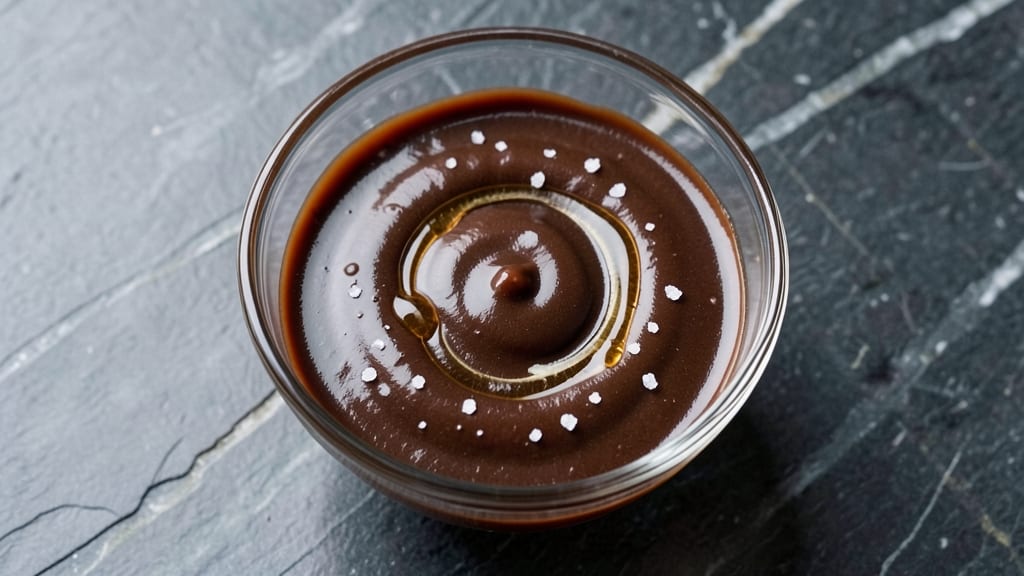
This baker's unsweetened chocolate sauce transforms simple desserts into decadent masterpieces with just three ingredients and 10 minutes of effort. The secret lies in tempering the chocolate properly to create a smooth, velvety drizzle that clings beautifully to cakes, pancakes, or even coffee.
I developed this recipe after years of testing—it’s the one that finally delivers that professional bakery finish without dairy or eggs.
The magic happens when you melt the chocolate with coconut oil (or another neutral fat) and a splash of liquid—whether it’s water, plant-based milk, or even a splash of coffee for depth. This method ensures rich, glossy texture without graininess, and the sauce stays stable even after chilling.
What makes it truly versatile is how it elevates everything it touches—drizzled over warm brownies, swirled into ice cream, or even used as a glaze for fruit.
What you’ll end up with is a luxuriously smooth, deeply aromatic sauce that’s perfect for both sweet and savory applications. The best part? It keeps beautifully in the fridge for up to 2 weeks, ready to transform any treat into something extraordinary.
Whether you’re a home baker or just love the occasional chocolate indulgence, this recipe is your new secret weapon.
Ready to make it? The instructions are simple, but the results are restaurant-quality—no fancy equipment or advanced techniques required. Let’s get started with a sauce that’s as easy to make as it is impressive to serve.
Ingredients for baker's unsweetened chocolate sauce
Three core ingredients plus optional depth—this sauce delivers bakery-style richness without dairy or eggs.
| Ingredient | Amount | Notes |
|---|---|---|
| Unsweetened Baker's Chocolate 🍫 | 8 oz | High-quality, finely chopped |
| Refined Coconut Oil 🥥 | ½ cup | Unflavored, neutral fat |
| Unsweetened Almond Milk 🥛 | ¼ cup | Barista-style preferred |
| Vanilla Extract 🌿 | 1 tsp | Pure, high-quality vanilla |
| Sea Salt 🧂 | ⅛ tsp | Fine grain, enhances flavor |
| Pure Maple Syrup 🍁 | 1 tbsp | Optional, for subtle sweetness |
| Espresso Powder ☕ | ½ tsp | For coffee depth (optional) |
The chocolate is non-negotiable here—Ghirardelli or Guittard baker's bars are my go-to, but any high-quality unsweetened chocolate works. Look for bars with at least 70% cocoa for that deep, velvety flavor. The coconut oil should be refined (not virgin) to avoid any coconut taste, and Trader Joe's or Whole Foods carry great options. If you're using a chocolate bar with a shell, crack it open and chop it finely—no need to grind it into powder. Pro tip: Room-temperature chocolate melts smoother, so take the bar out 10 minutes before you start.
No almond milk? Oat milk or cashew milk work just as well—just avoid soy milk if you're sensitive to its flavor. Skipping the vanilla? Vanilla bean paste adds even more depth, but pure extract is fine. The maple syrup is optional but recommended for balancing the bitterness—Grade B maple syrup has more complex flavor than Grade A. For the coffee depth, Starbucks espresso powder is reliable, but any good-quality instant espresso works. If you're feeling adventurous, swap the coconut oil for avocado oil or neutral vegetable oil, but coconut gives that perfect glossy finish.
This sauce is a fridge staple—store it in an airtight jar for up to 2 weeks, or freeze portions in ice cube trays for 3 months. To reheat, microwave in 10-second bursts until smooth. The texture thickens as it cools, so stir in a splash of warm water if it gets too stiff. I keep a jar in my pantry at all times—it’s perfect for last-minute drizzles over vegan brownies, ice cream, or even savory dishes like mushroom risotto. Double the batch if you're using it for a crowd—it disappears fast.
Why You'll Love This Recipe
- Here’s the thing: unsweetened chocolate actually tastes better when you let it shine. The salt cuts through the bitterness, vanilla deepens the flavor, and coconut oil adds a luscious mouthfeel—no syrup or sugar crashes, just pure, satisfying cocoa.
- Three-Ingredient Magic: I swear, this sauce comes together with just a pot, a whisk, and zero fuss. Melt the chocolate in coconut oil, stir in almond milk until silky—boom. No measuring cups, no waiting for eggs to set, just pure, velvety chocolate in under 10 minutes.
- Rich Without Sugar: Here’s the thing: unsweetened chocolate actually tastes better when you let it shine. The salt cuts through the bitterness, vanilla deepens the flavor, and coconut oil adds a luscious mouthfeel—no syrup or sugar crashes, just pure, satisfying cocoa.
- Dessert or Dinner Hero: Drizzle it over roasted sweet potatoes for a savory twist, swirl it into oatmeal for breakfast, or use it as a glaze for brownies. I’ve even poured it over vanilla ice cream when I’m lazy. It works everywhere, and no one will guess it’s this simple.
Step-by-step instructions for baker's unsweetened chocolate sauce
Here's how to create a silky, velvety chocolate sauce that elevates everything from ice cream to lattes.
Melt the Chocolate and Coconut Oil Together
Place the 8 oz unsweetened baker's chocolate and the 0.5 cup refined coconut oil in a medium heatproof bowl. Set this bowl over a pot of simmering water, ensuring the bottom of the bowl doesn't touch the water. This double boiler method prevents scorching while creating a perfectly smooth melt.
Stir gently with a silicone spatula, focusing on the edges where chocolate tends to cling. You'll notice the chocolate begins to soften within 2-3 minutes, then gradually becomes glossy and fully liquid. Remove from heat once it reaches a temperature of 110°F—this ensures it won't seize when you add liquids later. The mixture should look like thick, liquid velvet with no graininess remaining.
Whisk in Warm Almond Milk Gradually
In a separate small bowl, warm the 0.25 cup unsweetened almond milk until it reaches 100°F—just warm enough to feel slightly heated but not scalding. Slowly pour this warm milk into the melted chocolate mixture while whisking constantly. This gradual addition prevents the chocolate from seizing and creates an ultra-smooth texture.
Whisk vigorously for 1-2 minutes until the sauce thickens slightly and becomes completely homogeneous. You'll notice the sauce transform from a thin liquid to a rich, velvety consistency that coats the back of your spoon. This is where the magic happens—proper emulsification creates that luxurious mouthfeel we all crave.
Incorporate Flavor Enhancers
Add the 1 tsp vanilla extract, 1 tbsp pure maple syrup, 0.125 tsp sea salt, and 0.5 tsp espresso powder to the chocolate mixture. Whisk continuously for 30-45 seconds until all ingredients are fully incorporated and dissolved. The espresso powder will temporarily create a slightly gritty texture, but it will dissolve completely with continued whisking.
Taste the sauce and adjust sweetness if needed—you can add an extra ½ tsp of maple syrup if you prefer it sweeter. The salt enhances all the chocolate flavors, while the espresso powder adds a subtle depth that pairs beautifully with both sweet and savory applications. The sauce should now have a rich, complex aroma that hints at all these layered flavors.
Strain and Adjust Consistency
Pour the chocolate mixture through a fine-mesh strainer into a clean bowl to remove any remaining grit from the espresso powder. This step ensures your final sauce is completely smooth. For an extra-luxurious texture, you can press the mixture through the strainer using a silicone spatula.
If the sauce is too thick for your desired consistency, whisk in small amounts of warm almond milk, 1 teaspoon at a time, until you reach your preferred pouring thickness. For a thicker sauce that holds its shape on desserts, you can let it cool slightly before using. The sauce should be usable immediately but will thicken further as it cools to room temperature.
Use Immediately or Store Properly
Transfer the sauce to a clean jar or airtight container. For immediate use, drizzle over warm desserts, pancakes, or ice cream while the sauce is still warm. For storage, let it cool completely before sealing. This sauce will keep in the refrigerator for up to 2 weeks, though I find it's best used within 5-7 days for maximum freshness.
When ready to use, gently reheat in a double boiler or microwave in 10-second bursts, stirring between each, until it reaches 100°F—just warm enough to drizzle smoothly. The sauce should maintain its velvety texture and rich chocolate flavor, ready to elevate any dessert or beverage you pour it over.
Pro Tips For Making Baker'S Unsweetened Chocolate Sauce
- Chop the Chocolate: DESCRIPTION:
- Heat the Oil Slow: DESCRIPTION:
- Whisk Like You Mean It: DESCRIPTION:
- Salt Last, Taste First: DESCRIPTION:
Storing and reheating this dish
Fridge Storage Essentials
Store your chocolate sauce in an airtight glass jar or silicone-lidded container—glass preserves flavor better than plastic and won’t absorb odors. I use a mason jar with a tight seal from Ball because it keeps the sauce fresh for up to 2 weeks in the fridge.
The sauce will thicken slightly as it cools, but this is normal and easily fixed by whisking in 1 tsp warm water before reheating. Always let it cool completely before sealing to prevent condensation, which can dilute the flavor. 🧊
Freezer Portioning Tricks
For long-term storage, portion the sauce into ice cube trays—each cube makes a perfect single-serving drizzle. Once frozen solid, transfer cubes to a freezer bag with all air squeezed out. This method prevents freezer burn and keeps the sauce usable for 3 months.
When ready to use, thaw a cube in the fridge overnight or quickly in a bowl of warm water for 1-2 minutes. Never microwave frozen chocolate sauce directly—it can seize and become grainy. ❄️
Reheating for Perfect Texture
For fridge-stored sauce, reheat in 10-second bursts on medium-low power in the microwave, stirring between each interval. Stop when it reaches 100°F—any hotter and the sauce may separate.
For a smoother finish, use a double boiler instead: place the jar in a pot of simmering water for 3-5 minutes, stirring occasionally. The sauce should return to its velvety consistency without any graininess.
If it thickens too much after reheating, whisk in ½ tsp warm water to restore pourability. 🔥
Stability Hacks for Thickening
The sauce naturally thickens as it cools, but if it becomes too stiff after storage, here’s my trick: place the jar in a bowl of warm water (110°F) for 2-3 minutes, then whisk vigorously. The heat helps restore the fat content’s fluidity without melting the chocolate.
For a thicker sauce that holds its shape on desserts, chill it in the fridge for 1 hour before using—this creates a glossy, crack-like drizzle perfect for cakes or cookies. 💫
Savory Adaptations
This sauce isn’t just for desserts! For savory dishes like mushroom risotto or grilled steak, reduce the maple syrup to ½ tbsp and add ½ tsp smoked paprika instead of espresso powder. The deep chocolate flavor pairs surprisingly well with umami-rich foods.
Store the savory version separately—it keeps for 1 week in the fridge and reheats beautifully with a splash of beef broth to loosen the texture. 🍽️
Preventing Graininess
Graininess happens when chocolate cools too quickly or when liquids are added too fast. To avoid this, always melt chocolate and coconut oil together first, then gradually whisk in warm liquids.
If your sauce develops graininess after storage, return it to the double boiler for 1-2 minutes, then whisk vigorously until smooth. For extra insurance, strain the sauce through a fine-mesh sieve before storing—this removes any microscopic particles that could cause texture issues. 💡
Nutrition facts
Frequently asked questions
Can I substitute coconut oil with another fat?
Yes! Use avocado oil, neutral vegetable oil, or even dairy-free butter for the same velvety texture. The key is a neutral fat that won't overpower the chocolate. Coconut oil gives the best glossy finish, but avocado oil is my second choice for a slightly richer mouthfeel. Never use butter if you're keeping the recipe vegan.
Why did my chocolate sauce turn grainy?
Graininess happens when chocolate cools too quickly or when liquids are added too fast. Always melt chocolate and coconut oil together first, then whisk in warm liquids gradually. If it happens after storage, return the sauce to a double boiler for 1-2 minutes, whisking until completely smooth. Straining through a fine-mesh sieve before storing also prevents this issue.
How can I make this sauce sweeter?
Start with the 1 tbsp maple syrup in the recipe, then adjust to taste. For a sweeter version, add an extra ½ tsp maple syrup or swap for agave syrup. If you prefer caramel notes, try 1 tsp date syrup instead. Remember, this sauce is designed to complement rather than overpower desserts, so keep it balanced.
Can I use this sauce in savory dishes?
For savory applications like risotto or grilled meats, reduce the maple syrup to ½ tbsp and add ½ tsp smoked paprika instead of espresso powder. The deep chocolate flavor pairs beautifully with umami-rich ingredients. Store the savory version separately as it has a shorter shelf life of 1 week in the fridge.
What's the best way to thin a thickened sauce?
If your sauce thickens too much after storage, whisk in small amounts of warm water or plant-based milk, ½ tsp at a time, until you reach the desired consistency. For a smoother texture, place the jar in a bowl of warm water (110°F) for 2-3 minutes before whisking. This method restores the sauce's fluidity without melting the chocolate.