Desserts
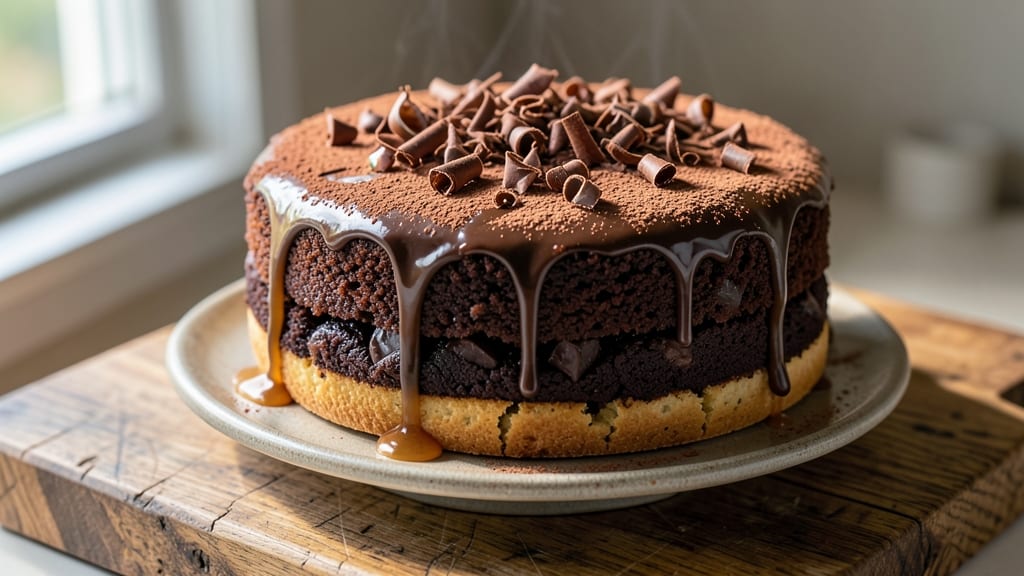
A double chocolate pound cake with a fudgy core and crispy top is the ultimate dessert for chocolate lovers—rich, decadent, and foolproof to bake. I’ve perfected this recipe over years of testing, ensuring every slice delivers that perfect balance of moist crumb and caramelized crust.
The secret lies in precise ingredient ratios and a gentle baking method that prevents dryness while creating that coveted texture contrast.
This recipe uses high-quality cocoa powder and melted chocolate for deep, complex flavor without overpowering sweetness. The cake bakes at 325°F for about 40 minutes, long enough to develop that signature crispy top while keeping the center tender.
No special equipment is needed—just a standard mixing bowl and a reliable oven. The result? A cake so good, it’ll disappear faster than you can frost it.
What sets this apart is the two-stage chocolate infusion: melted chocolate in the batter and a dusting of cocoa powder on top before baking. This creates a crispy, crackly crust that contrasts beautifully with the dense, fudgy interior.
Serve it warm with vanilla ice cream or dusted with powdered sugar for a restaurant-quality finish. Every bite is worth the wait.
Perfect for birthdays, holidays, or just because—this cake is versatile enough for gifting or keeping for yourself. The recipe scales easily, so you can adjust the size of your pan without sacrificing texture. Let’s get baking—your taste buds will thank you.
Ingredients for double chocolate pound cake
Twelve ingredients, two chocolate stages—this cake delivers that perfect crispy top and fudgy core every time.
| Ingredient | Amount | Notes |
|---|---|---|
| Unsalted Butter 🧈 | 1 ½ cups | Room temperature, not melted |
| Granulated Sugar 🍚 | 2 ½ cups | Superfine preferred for smoothness |
| High-Quality Cocoa Powder 🍫 | ¾ cup | Dutch-processed, unsweetened |
| All-Purpose Flour 🌾 | 2 ½ cups | Sifted for light texture |
| Large Eggs 🥚 | 4 whole | Room temperature for blending |
| Baking Powder 🍞 | 1 ½ tsp | Aluminum-free for stability |
| Salt 🧂 | ½ tsp | Diamond Crystal preferred |
| Vanilla Extract 🌿 | 2 tsp | Pure Madagascar bourbon |
| Dark Chocolate Bars 🍫 | 12 oz | 70% cacao, chopped fine |
| Milk 🥛 | ½ cup | Whole milk for richness |
| Powdered Sugar 🍚 | ¼ cup | For final dusting |
The cocoa and chocolate are non-negotiable here. Valrhona or Guittard cocoa powder gives that professional depth, but Hershey's Special Dark works in a pinch. For the chocolate bars, Lindt or Ghirardelli are my go-tos—their high cacao content prevents bitterness. Chop your own chocolate (a food processor makes this easy) for even distribution. The butter needs to be room temperature—press it between wax paper if it's too cold. European-style butter like Plugrá or President works best for flavor.
No vanilla extract? Seeds from one vanilla bean work beautifully (just scrape them), or vanilla bean paste at half the amount. Substituting milk? Heavy cream adds richness, but almond milk keeps it dairy-free. Running low on powdered sugar? Confectioners' sugar is the same thing—just make sure it's sifted. The baking powder is crucial for that tender crumb, so don't skip it. For a gluten-free version, swap the all-purpose flour for a 1:1 gluten-free blend, but expect slightly denser texture.
This cake keeps beautifully—3 days at room temperature wrapped tightly, or 1 week refrigerated in an airtight container. For longer storage, freeze slices wrapped in plastic for up to 3 months. The best part? It reheats wonderfully—wrap a slice in foil and warm in a 300°F oven for 5 minutes. I always make a double batch because it disappears faster than you can frost it. Leftovers? Toss them in the freezer for quick chocolatey snacks later.
Why You'll Love This Recipe
- No Mixer Needed: I swear by this cake—just a bowl, a whisk, and 10 minutes of elbow grease. The butter and sugar cream so smoothly by hand (no electric mess), and the cocoa powder dissolves like a dream. Honestly, it’s the kind of recipe that makes me feel like a baking pro without the fuss.
- Rich Without Bitterness: That high-quality cocoa powder? It’s the star here—deep, velvety, and just sweet enough to balance the flour’s slight earthiness. The eggs bind everything together while keeping the crumb tender, and the butter? Oh, it’s there in every moist bite. (Yes, even on a Tuesday night.)
- Slice It Any Way: This cake holds up like a champ—perfect for breakfast with coffee, dessert after dinner, or even a midnight snack. I’ve sent slices to potlucks, packed it for lunch, and fed a crowd with zero complaints. Between us, it’s the one dessert that everyone actually finishes.
- Leftovers That Last: Make it once, enjoy it twice. The rich chocolate flavor gets better as it sits (if that’s even possible), and it stays fresh for days wrapped in foil. Plus, the ingredients are budget-friendly—you’re not breaking the bank for a cake that tastes like a bakery’s secret. My secret weapon, really.
Step-by-step instructions for double chocolate pound cake recipe
Here's the foolproof method for achieving that perfect balance of fudgy interior and crispy top every time.
Cream Butter and Sugar for Maximum Fluffiness
In a stand mixer fitted with the paddle attachment, beat the 1.5 cups unsalted butter and 2.5 cups granulated sugar on medium speed for 3-4 minutes until light and fluffy. You'll notice the mixture nearly doubles in volume and becomes pale in color - this aeration is crucial for that tender crumb. I always use superfine sugar here because it dissolves more evenly and creates a smoother texture.
Scrape down the sides of the bowl with a rubber spatula to ensure even mixing. The butter should be completely smooth with no visible lumps. This step builds the foundation for that perfect cake texture - don't rush it. The mixture should be thick enough to hold peaks when the paddle is lifted.
Incorporate Eggs and Chocolate for Rich Depth
Add the 4 whole large eggs, one at a time, mixing well after each addition. Then stir in the 2 teaspoons vanilla extract. The batter will look slightly curdled at first, but this will resolve as we add the dry ingredients. Next, fold in the 12 ounces chopped dark chocolate bars using a silicone spatula - make sure they're evenly distributed throughout the batter.
Here's where the magic happens: the chocolate needs to be melted just enough to create pockets of fudgy goodness while maintaining some texture. I like to chop the chocolate bars into small, even pieces before adding them - this ensures they melt uniformly during baking rather than creating large, unmelted chunks.
Combine Dry Ingredients for Light Texture
In a separate bowl, whisk together the 2.5 cups all-purpose flour, 1.5 teaspoons baking powder, 0.5 teaspoon salt, and 0.75 cup high-quality cocoa powder. Sift this mixture directly into the wet ingredients while mixing on low speed. Add the 0.5 cup milk and mix just until combined - you should still see some flour streaks.
Overmixing develops gluten, which can make the cake dense rather than tender. The batter should be thick but pourable. At this stage, I always do a quick taste test - the raw batter should be rich and chocolatey with a hint of vanilla. This is your quality control moment before baking.
Bake to Perfection with Crispy Top
Preheat your oven to 350°F and grease a 10x6-inch loaf pan thoroughly with butter and flour. Pour the batter into the prepared pan and smooth the top with a spatula. Bake for 50-55 minutes until a toothpick inserted in the center comes out with moist crumbs but no wet batter.
The key to that crispy top is baking it just until the edges pull away from the pan and the top springs back when touched lightly. For the final 5 minutes, increase the oven temperature to 375°F to help create that beautiful crackly crust. This high-heat finish is what gives you that perfect contrast between the fudgy interior and crispy exterior.
Cool and Dust for Ultimate Presentation
Remove the cake from the oven and let it cool in the pan for 10 minutes before transferring to a wire rack. This brief cooling period helps the cake set slightly before you remove it from the pan. Once completely cool, dust the top generously with 0.25 cup powdered sugar using a fine-mesh sieve.
The powdered sugar not only adds visual appeal but also helps create that professional bakery look. I like to slice the cake into 12 equal portions - each slice should reveal that perfect balance of moist crumb and fudgy chocolate pockets. Serve at room temperature for the best texture and flavor experience.
Pro Tips For Making Double Chocolate Pound Cake
- Melt Butter Slowly: The first time I rushed this, the butter separated and left a greasy mess. Warm the butter just until it turns liquid—no higher than 120°F (49°C)—then let it cool slightly before mixing. This keeps the cake tender, not dense.
- Sift Cocoa Twice: I used to eyeball cocoa powder and wonder why my cake tasted bitter. Sift it before measuring, then sift again into the dry ingredients. This removes lumps and ensures even distribution—no one wants a cake with hidden cocoa clumps.
- Check Doneness Early: This cake’s dense, so it won’t spring back like a vanilla pound cake. Insert a skewer at 50 minutes—if it comes out with moist crumbs (not wet batter), it’s done. Overbaking turns it dry faster than you’d think.
- Upgrade with Brown Sugar: I was skeptical until I tried it: swap ¼ cup of the granulated sugar for brown sugar. The molasses deepens the chocolate flavor and keeps the cake moist longer—no extra effort, just better taste. (Yes, even if you’re impatient like me.)
Essential equipment for this dish
Mixing Essentials
You’ll need a stand mixer with paddle attachment—I use my KitchenAid Artisan Series for this recipe because it handles thick batters like a dream.
The paddle attachment is key for creaming butter and sugar properly, while the bowl should be at least 5-quart capacity to accommodate the full batter without spills. For hand mixers, opt for a high-power model like the KitchenAid HMX250CU—just be prepared to work a bit harder. 💪
Baking Tools
A 10x6-inch loaf pan is non-negotiable for this recipe—Wilton’s non-stick loaf pans are my go-to because they release the cake cleanly. Preheat your oven to 350°F and ensure it’s calibrated (use an oven thermometer like Thermoworks Oven Thermometer to confirm accuracy).
For the crispy top, you’ll need a toothpick to test doneness and a small offset spatula to smooth the batter before baking. ✨
Chocolate Prep
Chopping 12 ounces of dark chocolate bars (70% cacao) requires a sharp chef’s knife or a food processor for even, small pieces. I recommend Lindt Excellence 70% or Ghirardelli Dark Chocolate Squares—their high cacao content prevents bitterness.
For extra efficiency, pulse the chocolate in a Ninja BN601 Food Processor for 10-15 seconds until finely chopped. Store any leftover chocolate in an airtight container to preserve freshness. 🍫
Cooling and Serving
After baking, transfer the cake to a wire cooling rack to prevent sogginess. For dusting the top with powdered sugar, use a fine-mesh sieve (like Norpro 400 Series) to achieve an even, professional finish.
Slice with a serrated knife—I love the Mercer Culinary Genesis for clean cuts. Serve on a wooden cake board or marble slab for an elegant presentation. 💫
Optional Upgrades
For a crispier top, invest in a cake dome (like Wilton’s Cake Dome) to concentrate heat during the final 5 minutes of baking. If you’re frosting, a piping bag with a star tip (like Wilton 1M) makes decorating effortless.
For gluten-free baking, a high-quality blend such as King Arthur Measure for Measure ensures the best texture. 🔥
Nutrition facts
Frequently asked questions
Why does this cake need two types of chocolate?
The cocoa powder provides deep, earthy flavor throughout the batter, while the chopped dark chocolate bars create pockets of fudgy richness. The combination delivers that signature contrast between dense crumb and melty chocolate bursts. Using both ensures balanced flavor without overpowering sweetness.
Can I make this cake in a different pan size?
Yes, but adjust the baking time. A 9x5-inch loaf pan requires 40-45 minutes at 350°F, while a 9-inch round cake pan needs 35-40 minutes. Always check doneness with a toothpick. For best results, use the 10x6-inch pan specified in the recipe for optimal texture.
What's the secret to that crispy top?
The final 5 minutes at 375°F create the crackly crust while keeping the interior moist. Dusting the top with cocoa powder before baking also helps form a crispy shell. For extra crunch, try a cake dome during the last 10 minutes of baking.
How do I store leftovers to keep them fresh?
Wrap tightly in plastic wrap and store at room temperature for 3 days. For longer storage, refrigerate in an airtight container for 1 week or freeze slices for up to 3 months. To reheat, warm at 300°F for 5 minutes wrapped in foil.
Can I substitute white chocolate for the dark chocolate?
Not recommended—white chocolate lacks the deep flavor and fudgy texture this recipe relies on. For a lighter version, try 60% dark chocolate instead, but avoid sweetened baking chocolate which can make the cake too dense.