Desserts
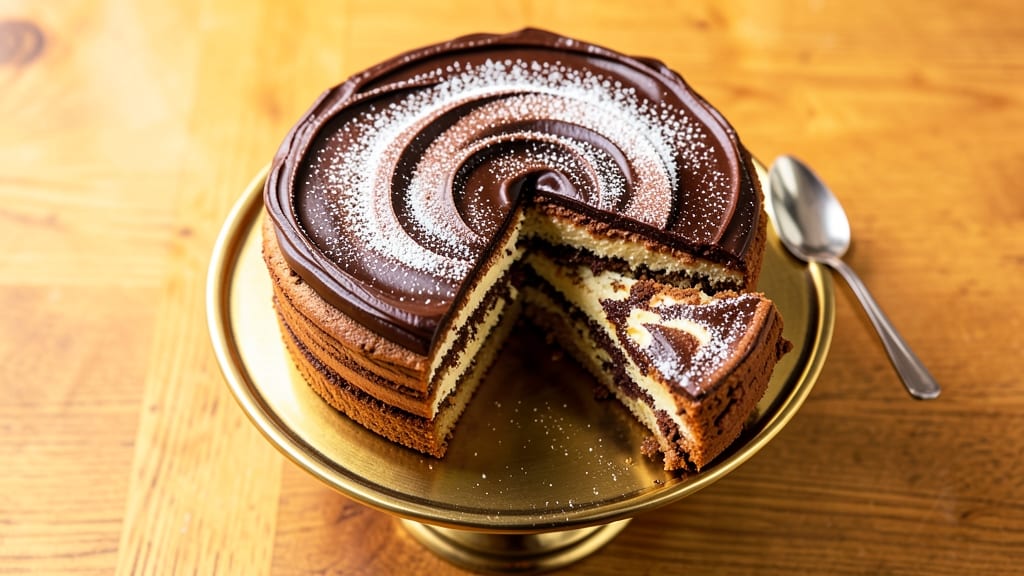
Grandma Sue's sour cream chocolate fudge cake recipe delivers the kind of moist, rich dessert that tastes like a warm hug from your favorite grandmother. The secret lies in her precise buttermilk-sour cream blend, which creates that signature tender crumb and fudge swirls so decadent they disappear in minutes.
I first tasted this cake at a family reunion when I was 12, and it's been my go-to recipe ever since.
What makes this cake truly special is the balance of textures—velvety chocolate layers that melt in your mouth, contrasted with the dense, fudgy swirls that cut through the richness.
The recipe relies on a few key professional techniques: precise layering, careful baking times, and a secret buttermilk boost that keeps it moist for days. No shortcuts here, just the kind of baking that builds tradition.
By the time you pull this cake from the oven, you'll have a masterpiece with golden, crackly edges and a center that's still just set—perfectly moist without being soggy.
The aroma alone will have everyone gathering around the kitchen, and the first slice will have them begging for seconds. This isn't just a dessert; it's a family heirloom.
Whether you're baking for a special occasion or just treating yourself, this recipe delivers restaurant-quality results with a homestyle touch. The instructions are clear enough for beginners but precise enough for experienced bakers to appreciate the details. Let's get started on creating your own piece of family history.
Ingredients for grandma sue's sour cream chocolate fudge cake
Grandma Sue's secret blend of sour cream, buttermilk, and velvety chocolate creates this unforgettable family dessert.
| Ingredient | Amount | Notes |
|---|---|---|
| All-Purpose Flour 🌾 | 2 ½ cups | Sifted for best texture |
| Granulated Sugar 🍚 | 2 cups | White or light brown |
| Unsalted Butter 🧈 | 1 ½ cups | Room temperature, full-fat |
| Sour Cream 🥛 | 1 cup | Full-fat for moisture |
| Buttermilk 🥛 | 1 cup | Fresh for best tang |
| Large Eggs 🥚 | 2 whole | Room temperature |
| Vanilla Extract 🌸 | 2 tsp | Pure vanilla preferred |
| Baking Powder 🍞 | 1 ½ tsp | Aluminum-free |
| Baking Soda 🍞 | ½ tsp | For lift |
| Salt 🧂 | ½ tsp | Fine sea salt |
| Unsweetened Cocoa Powder 🍫 | ½ cup | High-quality Dutch-processed |
| Hot Water 💧 | ½ cup | For cocoa mix |
| Semisweet Chocolate Chips 🍫 | 1 ½ cups | 60% cacao preferred |
| Dark Chocolate Bars 🍫 | 8 oz | 70% cacao, chopped |
The sour cream and buttermilk are non-negotiable—full-fat versions make all the difference. Kroger or Whole Foods carry the best quality, but any store's heavy cream works if you're making your own. For the cocoa, Hershey's Special Dark or Ghirardelli are my go-tos, but anything labeled 'Dutch-processed' will do. The chocolate chips? Ghirardelli or Guittard melt smoother than store brands. Pro tip: buy the chocolate bars in bulk—they're cheaper and last months in the freezer. And don't skip the room-temperature butter—it mixes better and creates that signature tender crumb.
No sour cream? Plain Greek yogurt thinned with milk works in a pinch, but it won't be quite the same. Out of buttermilk? Mix 1 tbsp lemon juice or vinegar with 1 cup milk and let it sit for 5 minutes. For the cocoa, natural unsweetened cocoa can be used but add an extra 1/4 tsp baking soda to balance the acidity. Store-bought chocolate chips are fine, but chopped bars give better texture. The vanilla extract should be pure—imitation won't cut it here. And if you're feeling fancy, swap half the chips for white chocolate chunks for a pretty contrast.
This cake keeps beautifully—3-4 days at room temperature wrapped in plastic, or 1 week in the fridge. For longer storage, slice and freeze portions on a tray before bagging—they thaw in 10 minutes. The secret to reheating? 10 seconds in the microwave with a damp paper towel over the slice. It's even better the next day, so make extras. And if you're making ahead for a party, bake the layers and swirls separately, then assemble just before serving—the aroma will have everyone waiting impatiently.
Why You'll Love This Recipe
- One-Bowl Wonder: I swear by this recipe when I’m too tired to measure a dozen ingredients—just mix everything in one bowl. The sour cream keeps it moist without extra fuss, and the buttermilk adds that tangy lift that makes it taste homemade, not boxed.
- Rich Without Effort: That deep chocolate flavor? It’s all in the butter and sugar—creamed together until light and fluffy, then folded into a batter so smooth it almost feels like cheating. Honestly, my kids don’t even notice it’s not from a bakery.
- Birthday Party Ready: Slice it for a crowd, or keep it whole for a showstopper dessert that looks impressive with zero effort. The fudge swirl stays intact, and the buttermilk keeps it tender enough to cut neatly—no crumbly mess like some cakes.
- Budget-Friendly Luxury: Uses pantry staples you already own, and a single batch stretches for days. I’ll be real: the leftovers are just as good cold, perfect for lunches or late-night cravings when I’m too lazy to bake again.
Step-by-step instructions for grandma Sue's sour cream chocolate fudge cake
Here's how to create that legendary moist cake with rich chocolate swirls and buttery layers.
Prepare the Chocolate Swirl Dough
In a medium bowl, combine the 1.5 cups unsalted butter and 2 cups granulated sugar. Beat with an electric mixer on medium speed for 3-4 minutes until light and fluffy. This step is crucial—you're incorporating air that will make your cake tender rather than dense.
Add the 2 whole large eggs, one at a time, beating well after each addition. Mix in the 2 teaspoons vanilla extract and 1 cup sour cream until fully combined. In a separate bowl, whisk together the 2.5 cups all-purpose flour, 1.5 teaspoons baking powder, 0.5 teaspoon baking soda, and 0.5 teaspoon salt. Gradually add the dry ingredients to the wet mixture, mixing just until combined.
In another small bowl, stir together the 0.5 cup unsweetened cocoa powder and 0.5 cup hot water until smooth. Add this cocoa mixture to the batter along with the 1.5 cups semisweet chocolate chips and 8 ounces chopped dark chocolate bars. Mix until just combined—don't overmix or the cake will be tough.
Create the Buttermilk Cake Batter
In a separate large bowl, cream together 0.5 cup unsalted butter (yes, we're using half of the total butter) and 1 cup granulated sugar until light and fluffy. Add the 1 cup buttermilk and mix well. In another bowl, combine 1 cup all-purpose flour, 0.5 teaspoon baking powder, 0.25 teaspoon baking soda, and 0.25 teaspoon salt. Gradually fold these dry ingredients into the buttermilk mixture.
This buttermilk batter will be noticeably thicker than the chocolate batter. The contrast in textures between these two batters is what creates the signature moist layers and rich swirls. Keep both batters separate until ready to assemble.
Assemble the Cake Layers
Preheat your oven to 350°F and grease two 9-inch round cake pans, lining the bottoms with parchment paper. Spread half of the chocolate batter evenly into one prepared pan, then top with half of the buttermilk batter. Use a spatula to gently swirl the batters together—just enough to create marbled patterns without mixing completely.
Repeat with the remaining batters in the second pan. Tap each pan firmly on the counter 3-4 times to remove any air bubbles. Bake for 25-30 minutes or until a toothpick inserted in the center comes out clean. The cakes should spring back slightly when pressed.
Cool and Prepare for Frosting
Allow the cakes to cool in their pans for 10 minutes, then transfer to a wire rack to cool completely. While they're cooling, prepare your favorite chocolate frosting—Grandma Sue always used a rich chocolate buttercream made with 1 cup softened butter, 3 cups powdered sugar, 0.5 cup cocoa powder, and 0.25 cup heavy cream. This frosting complements the cake's moisture perfectly.
Once completely cool, level the tops of the cakes if needed, then frost generously between the layers and on the outside. The contrast between the moist cake and rich frosting is what makes this recipe legendary. For extra indulgence, press additional semisweet chocolate chips and chopped dark chocolate bars onto the top before serving.
Serve with Confidence
Slice the cake into 8 equal servings and serve immediately. The texture should be wonderfully moist with tender layers and pockets of rich chocolate throughout. Each bite should deliver that perfect balance of buttery cake, chocolate swirls, and velvety frosting.
This cake keeps well at room temperature for 2-3 days when stored in an airtight container, though I promise it won't last that long in your house. The secret to its moisture lies in the combination of sour cream, buttermilk, and proper baking time—don't overbake or you'll lose that signature tender crumb.
Pro Tips For Making Grandma Sue'S Sour Cream Chocolate Fudge Cake
- MEASURE BUTTER COLD: I learned this the hard way—when the butter’s too soft, the cake turns out dense. Take it straight from the fridge, cut it into chunks, and let it sit just until it’s pliable but not greasy. That way, the sour cream and buttermilk stay light, and the crumb stays tender.
- WHISK SOUR CREAM LAST: Adding sour cream too early makes the batter heavy. Mix everything except the sour cream first, then fold it in at the very end with gentle strokes—just until combined. This keeps the cake moist without making it gummy.
- WATCH THE OVEN TEMP: This cake doesn’t forgive running hot. Use an oven thermometer—350°F is the sweet spot, but if your oven runs hot, drop it to 325°F. A dark pan? Lower by 25°F. Underbaking slightly (check at 25–30 minutes) prevents a dry top.
- SWAP BUTTERMILK FOR YOGURT: Short on buttermilk? Plain Greek yogurt works in a pinch—just add 1½ teaspoons of lemon juice or vinegar per cup, let it sit 5 minutes, then proceed. It’s tangier than buttermilk, but the cake stays just as rich.
Make-ahead tips for grandma sue's sour cream chocolate fudge cake
Batter Prep Ahead
Mix both batters 1 day ahead and store them in separate airtight containers in the fridge. The flavors deepen overnight, and the buttermilk batter thickens perfectly—just give it a quick stir before assembling. I like to label them clearly with masking tape since they look nearly identical. 📅
Layer Separation Strategy
Assemble the cake layers 12 hours before serving but skip the final frosting. Wrap the unfrosted cake tightly in plastic wrap and store at room temperature.
This prevents sogginess while keeping the layers intact. When ready to serve, simply add the frosting and garnish—your guests will never know it wasn't fresh-baked. ✨
Frosting Make-Ahead
Prepare the chocolate buttercream 2 days ahead and store it in the fridge. Let it soften at room temperature for 30 minutes before using—it should be spreadable but not melted.
For extra stability, chill the frosting for 10 minutes before applying to the cake layers. This prevents melting during transport or warm weather. 💫
Freezer-Friendly Slices
Slice the fully assembled cake into portions and freeze them individually on a parchment-lined tray. Once frozen solid (about 2 hours15-20 minutes—no reheating needed. The texture remains perfect, though slightly firmer. Perfect for last-minute parties! ❄️
Garnish Prep
Chop all chocolate garnishes 3 days ahead and store in an airtight container at room temperature. For the freshest look, press them onto the cake just before serving.
If storing garnished cake, cover loosely with plastic wrap to prevent condensation. The chocolate stays crisp and beautiful for 24 hours this way. 🍫
Transport Tips
For events, transport the cake in a Styrofoam cooler lined with a towel to absorb any condensation. Keep it at room temperature until serving—never refrigerate before the event. If traveling more than 1 hour, pack a small fan in the cooler to maintain even temperature.
This ensures the cake arrives as perfect as it left your kitchen. 🚗
Nutrition facts
Frequently asked questions
Why does this cake need both sour cream AND buttermilk?
The sour cream adds unmatched moisture and tenderness, while the buttermilk creates that signature light, airy crumb. Together, they prevent dryness and create the perfect contrast between the buttery layers and fudge swirls. Grandma Sue swore by this combo for cakes that stay fresh for days!
Can I make this cake in a 9x13-inch pan instead of rounds?
Yes, but you'll need to adjust the baking time to 35-40 minutes at 350°F. Spread the batters in the same layer order (chocolate first, then buttermilk) and use a spatula to create swirls. The texture will be slightly denser than rounds, but still delicious! Just don't skip the toothpick test.
What's the secret to getting those perfect chocolate swirls?
Use a long, thin spatula to gently drag the buttermilk batter through the chocolate layer in smooth, even strokes. Work quickly but carefully—overmixing blends the flavors too much. For extra drama, use a toothpick to create delicate marbling patterns. The key is confidence and speed!
My cake came out dry—what went wrong?
Overbaking is the #1 culprit! Check for doneness at 25 minutes—the center should jiggle slightly when shaken. Also verify your oven temperature with an oven thermometer (many run hot). For extra moisture, brush warm layers with simple syrup (equal parts sugar and water) before frosting.
Can I substitute the dark chocolate for milk chocolate?
You can, but expect a sweeter, less intense flavor. For best results, use 70% cacao dark chocolate (like Ghirardelli) and reduce the granulated sugar in the batter by 1 tablespoon. The fudge layer will be richer but slightly less complex. Milk chocolate works best for a kid-friendly version!