Desserts
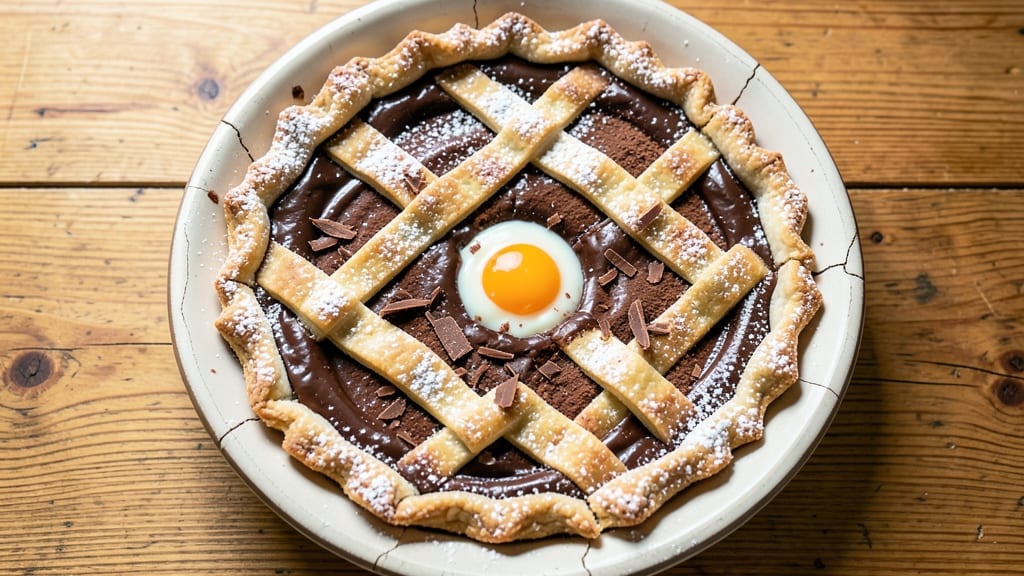
Grandma's old-fashioned chocolate pie recipe is the kind that carries the weight of family dinners and Sunday afternoons spent in a sunlit kitchen.
The secret lies in the hand-passed crust—a technique that creates a delicate, flaky texture without the fuss of rolling dough—and a rustic spice dust that transforms ordinary chocolate into something deeply comforting.
I first learned this recipe from my grandmother, who swore by the slow, deliberate process of building flavor layer by layer.
What makes this pie truly special is the balance of textures: a crisp yet tender crust, a velvety chocolate filling that’s neither too sweet nor too rich, and a light dusting of cinnamon and nutmeg that adds warmth without overpowering.
The filling is made with a simple combination of cocoa, eggs, and sugar, but the magic happens in the baking—just enough time to set the filling while keeping it rich and fudgy at the center. This isn’t just dessert; it’s a piece of nostalgia wrapped in a flaky crust.
By the time you pull this pie from the oven, the kitchen will smell like childhood memories, and every slice will reveal that perfect contrast of crisp edges and melt-in-your-mouth chocolate. The rustic spice dust on top adds a subtle complexity that elevates it beyond basic chocolate pie.
Whether you serve it with whipped cream, a scoop of vanilla ice cream, or just as it is, this pie is a testament to the power of tradition and patience.
For those who want to put their own spin on it, you can swap the hand-passed crust for a graham cracker crust or top the pie with a drizzle of chocolate ganache instead of spice dust.
The beauty of this recipe is its flexibility—it’s a classic, but it’s yours to make your own. Let’s get started on recreating this timeless dessert.
Ingredients for grandma's old fashioned chocolate pie
Simple pantry staples transform into Grandma's legendary pie—flaky crust, rich filling, and that nostalgic spice dust.
| Ingredient | Amount | Notes |
|---|---|---|
| All-Purpose Flour 🌾 | 2 ½ cups | Sifted for light texture |
| Cold Unsalted Butter 🧈 | 1 cup | Cut into small cubes |
| Granulated Sugar 🍚 | ½ cup | For crust sweetness |
| Large Egg Yolks 🥚 | 1 whole | For binding crust |
| Ice Water 💧 | ¼ cup | For dough consistency |
| Salt 🧂 | ½ tsp | Kosher or sea salt |
| Unsweetened Cocoa Powder 🍫 | ¾ cup | High-quality Dutch-processed |
| Light Brown Sugar 🍚 | 1 ¼ cups | Packed firmly |
| Large Eggs 🥚 | 2 whole | Room temperature |
| Whole Milk 🥛 | ½ cup | Full-fat preferred |
| Vanilla Extract 🍯 | 1 tbsp | Pure vanilla preferred |
| Ground Cinnamon 🌿 | 1 tsp | Freshly ground preferred |
| Ground Nutmeg 🌿 | ½ tsp | Freshly grated |
| Powdered Sugar 🍚 | ¼ cup | For dusting |
The crust is where the magic starts. Cold butter is non-negotiable—it creates those delicate flakes. I like to buy Land O'Lakes or Plugrah butter from the dairy section, not the pre-packaged tubs. For the flour, King Arthur or Gold Medal are my go-tos—they give that perfect balance of tenderness and crispness. The key is keeping everything cold: chill your butter, your dough, even your hands. That hand-passed technique? It's all about working quickly and gently. If you're nervous about the crust, start with a store-bought pie shell and just focus on the filling—it's still delicious that way.
No cocoa powder? Melted dark chocolate (70% cocoa) at half the amount works in a pinch, but it'll be richer. Brown sugar substitute? White sugar plus 1 tsp molasses mimics that caramel depth. The milk can be swapped for heavy cream if you want extra richness, but whole milk gives that classic texture. For the spices, Penzeys or local spice shops carry the best ground cinnamon and nutmeg—freshly ground makes all the difference. If you're out of nutmeg, allspice at half the amount gives a similar warmth. And if vanilla extract is missing? Scraped vanilla bean seeds are worth the splurge for that authentic flavor.
The crust dough keeps 2 days wrapped in plastic in the fridge, or 3 months frozen between parchment. The filling can be prepped ahead and stored in the fridge for 1 day before baking—just give it a quick whisk before pouring. The finished pie reheats beautifully: 350°F for 10 minutes warms it up without drying. Leftovers? Slice and freeze portions with parchment between them for easy single servings. Trust me, the first slice out of the freezer is just as good as the first slice out of the oven.
Why You'll Love This Recipe
- No-Fuss Crust: I swear by that cold butter cut into flour—no food processor, no stress. Just fingers and a pinch of salt, then press it in the pan like you’re tucking in a blanket. Honestly, this crust is foolproof even when I’m half-asleep.
- Rich Without Fuss: That sugar-butter-yolk mix? It’s where the magic happens. The yolks keep it velvety, not grainy, and the sugar caramelizes just enough to give it that almost fudgy depth. (Yes, even on a Tuesday night.)
- Leftovers? Better Than Fresh: This pie actually tastes better the next day—crust stays crisp, filling thickens into pure chocolate bliss. I’ve sent slices to work in Tupperware, and no one’s ever questioned why they’re bringing dessert.
- Budget Dessert Hero: Flour, butter, sugar, eggs—these are pantry staples that won’t break the bank. I’ve made this for potlucks, birthday cakes, and even a last-minute teacher appreciation gift. It’s the kind of dessert that says “I care” without saying “I spent hours.”
Step-by-step instructions for Grandma's old fashioned chocolate pie
Here's how to make this classic pie with a hand-passed crust and rich spiced filling.
Prepare the Hand-Passed Crust
In a large bowl, combine the 2.5 cups all-purpose flour and 0.5 cup granulated sugar. Add the 0.5 teaspoon salt and mix gently with a fork. Cut in the 1 cup cold unsalted butter using a pastry cutter or your fingers until the mixture resembles coarse crumbs with pea-sized butter pieces.
Add the 1 whole large egg yolk and 0.25 cup ice water gradually, mixing just until the dough comes together. Avoid overworking it. Shape the dough into a disk, wrap in plastic, and refrigerate for 30 minutes. This resting time makes it easier to roll out and prevents cracking.
Roll and Assemble the Crust
On a lightly floured surface, roll the chilled dough into a 12-inch circle about ⅛-inch thick. Transfer it to a 9-inch pie dish, trimming any excess dough. Press the edges gently against the pie dish to create a slight rim. Prick the bottom with a fork to prevent puffing during baking.
Preheat your oven to 375°F. Line the crust with parchment paper, fill it with pie weights or dried beans, and bake for 15 minutes. Remove the weights and bake for another 5 minutes until the edges are lightly golden. This pre-baking step ensures a sturdy crust that won't sog down.
Make the Rustic Spiced Chocolate Filling
In a medium saucepan, whisk together the 1.25 cups light brown sugar, 0.75 cup unsweetened cocoa powder, 2 whole large eggs, 0.5 cup whole milk, 1 tablespoon vanilla extract, 1 teaspoon ground cinnamon, and 0.5 teaspoon ground nutmeg. Cook over medium heat, stirring constantly, until the mixture thickens to a pudding-like consistency—about 8-10 minutes. It should coat the back of a spoon.
Remove from heat and let cool for 5 minutes. The filling should be thick but still pourable. Pour the cooled filling into the pre-baked crust, spreading it evenly. The mixture will sink slightly as it sets.
Bake to Perfection
Bake the pie at 350°F for 40-45 minutes, until the center is just set but still slightly jiggly. A toothpick inserted should come out with a few moist crumbs, not wet batter. Let the pie cool completely on a wire rack—this prevents cracking as it sets.
Once cooled, dust the top with 0.25 cup powdered sugar for a classic finish. Serve slices warm or at room temperature, and you'll taste Grandma's secret blend of rich cocoa and comforting spices in every bite.
Pro Tips For Making Grandma'S Old Fashioned Chocolate Pie
- Cut Butter in Pulses: Use your fingers or a pastry cutter to work the cold butter into the flour—small, quick presses until it resembles coarse crumbs. Overmixing turns the crust dough gummy, and nobody wants a soggy pie crust. I learned this the hard way when my first attempt looked like playdough instead of a flaky base.
- Whisk Yolks Like Mad: Beat those egg yolks with sugar until they’re thick, pale, and ribbon-like—about 3-4 minutes. Skimp here, and the filling will taste flat and underseasoned. My grandmother swore by this step, and she was right: the filling’s richness depends on it.
- Chill the Dough Twice: Wrap the crust dough tightly in plastic and refrigerate for at least 1 hour before rolling it out, then chill the shaped crust another 20 minutes before baking. Rushing this makes the crust shrink or puff unevenly—trust me, you’ll regret it when the edges turn brown before the center.
- Ice Water Only: Use ice water (yes, actual ice cubes) to bind the dough—just 1-2 tablespoons at a time. Warm water makes the butter melt too fast, and you’ll end up with a dense, greasy mess. I was skeptical until I tried it—now it’s non-negotiable for me.
Creative variations of this recipe
Graham Cracker Twist
Swap the hand-passed crust for a graham cracker crust by crushing 1.5 cups graham cracker crumbs with ½ cup melted butter and 2 tbsp sugar. Press firmly into a 9-inch pie dish and bake at 350°F for 10 minutes before adding filling.
This adds a nutty, slightly sweet contrast to the rich chocolate. I like to toast the crumbs in a dry pan for 2 minutes first to deepen their flavor. 🌟
Chocolate Ganache Topping
For a decadent finish, replace the spice dust with a chocolate ganache drizzle. Heat ½ cup heavy cream and 4 oz chopped dark chocolate (70%) together, then pour over the cooled pie.
Let set for 15 minutes before slicing. Add ½ tsp vanilla extract to the ganache for extra depth. This works especially well if you've used a graham cracker crust.
Espresso Infusion
Boost the chocolate flavor with 1 tbsp instant espresso powder mixed into the filling. The bitterness balances the sweetness beautifully. I use Starbucks Via for consistent results. For an even stronger kick, steep 1 tbsp finely ground coffee in the ½ cup milk before adding it to the filling.
This variation is perfect for coffee lovers who want their dessert to pack a punch. ☕
Nutty Crunch Layer
Add texture with a toasted pecan or walnut layer. Toast 1 cup chopped nuts in a dry pan for 5 minutes until fragrant, then sprinkle over the filling before baking. For extra richness, toss the nuts with 1 tbsp brown sugar and ½ tsp cinnamon before adding.
This creates a delightful crunch in every bite that pairs perfectly with the creamy filling.
Boozy Variations
For an adult twist, stir 1 tbsp bourbon or rum into the filling while it cooks. The alcohol burns off during cooking but leaves behind subtle warmth. I recommend Maker's Mark bourbon for its caramel notes.
For a darker flavor, use dark rum like Kraken. This works especially well with the graham cracker crust variation for a sophisticated dessert. 🥃
Seasonal Citrus Zest
Brighten up the pie with 1 tbsp orange or lemon zest mixed into the filling. The citrus cuts through the richness and adds a refreshing contrast. I find Valencia orange zest works best—it's sweeter and more aromatic.
Pair this with a dusting of powdered sugar mixed with ½ tsp lemon zest on top. This variation shines in spring or summer when you want something lighter yet still indulgent.
Nutrition facts
Frequently asked questions
Why does this pie recipe use a hand-passed crust instead of rolled dough?
The hand-passing technique creates a lighter, more delicate texture with fewer layers than rolled dough. This method also prevents the crust from shrinking during baking, giving you that classic old-fashioned look. Plus, it's faster and less messy than traditional rolling!
Can I make this pie ahead of time?
The crust can be pre-made and frozen for up to 3 months, while the filling can be prepared a day ahead. For best results, bake the pie fresh, but you can reheat slices at 350°F for 10 minutes to restore that homemade warmth.
What's the secret to getting the perfect chocolate filling texture?
The filling should be thick but pourable when poured—the consistency of pudding. Cook it until it coats the back of a spoon, then let it cool slightly before baking. This ensures a creamy center with crisp edges. Overcooking will make it dry, while undercooking may leave it too runny.
How do I fix a cracked crust?
If cracks appear during baking, don't panic! They're common with hand-passed crusts. Brush them with a little milk or egg wash and bake until golden. For extra insurance, chill your dough longer or use slightly less water. The filling will still taste amazing—it's all about the flavor!
Can I use this recipe for a gluten-free version?
Yes, but with adjustments. Replace the all-purpose flour with a 1:1 gluten-free flour blend and add ½ tsp xanthan gum to the crust. For the filling, use gluten-free ingredients and check that your cocoa powder is certified gluten-free. The texture will be slightly different but still delicious.