Breakfast & Brunch
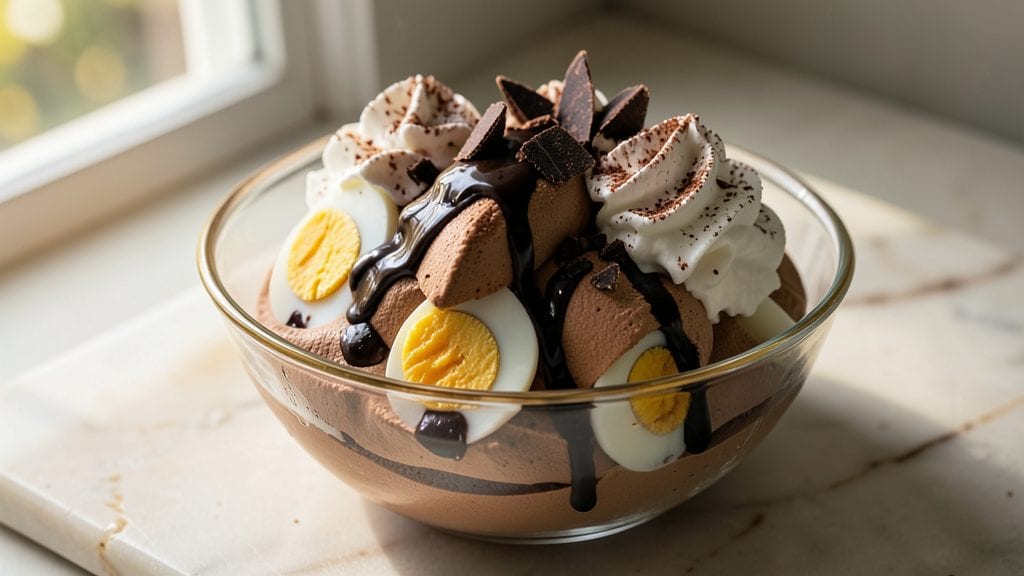
When you think of chocolate mousse, you probably don’t picture eggs—but this hard-boiled egg chocolate mousse delivers a silky, protein-rich twist that defies expectations. The secret lies in blending egg yolks with dark chocolate and cream, creating a texture that’s lighter than traditional versions while packing a nutritional punch.
I developed this recipe after realizing how often store-bought mousses fell short in both flavor and texture, and this method solves both problems with just a few simple ingredients.
The process starts with perfectly hard-boiled eggs—the yolks must be smooth and fully cooked to avoid graininess in the final mousse. From there, it’s a matter of whisking yolks with melted chocolate and heavy cream until the mixture reaches that signature velvety consistency.
The result is a dessert that’s rich yet airy, with none of the heaviness you might expect from a chocolate-based treat. This recipe also works as a great breakfast option, offering a satisfying way to start the day with a dessert-like experience.
What makes this mousse truly special is how it balances indulgence with nutrition. The hard-boiled eggs add protein and stability to the texture, while dark chocolate provides deep cocoa flavor without overpowering the palate.
Chilling time is minimal—just a few hours—to ensure the perfect set, and the final product holds its shape beautifully when served. Whether you’re hosting a brunch or treating yourself to a decadent morning dessert, this recipe delivers restaurant-quality results at home.
Pair it with fresh berries, a dusting of cocoa powder, or a dollop of whipped cream for an elevated presentation. The versatility of this recipe makes it ideal for both casual and special occasions, proving that even classic desserts can be reinvented with a few clever techniques.
Let’s get started on creating your own protein-boosted chocolate mousse.
Ingredients for hard boiled egg chocolate mousse
Four eggs and eight ounces chocolate create a protein-packed mousse that surprises everyone.
| Ingredient | Amount | Notes |
|---|---|---|
| Large Eggs 🥚 | 4 whole | Hard-boiled, yolks separated |
| Dark Chocolate Bars 🍫 | 8 oz | 70% cocoa, chopped finely |
| Heavy Whipping Cream 🥛 | 1 cup | Full-fat for best texture |
| Granulated Sugar 🍚 | ¼ cup | Adjust to taste preference |
| Unsalted Butter 🧈 | 2 tbsp | For melting chocolate |
| Vanilla Extract 🌿 | 1 tsp | Pure vanilla preferred |
| Pinch of Salt 🧂 | ⅛ tsp | Enhances chocolate flavor |
| Powdered Sugar 🍚 | 2 tbsp | For dusting servings |
| Fresh Berries 🍓 | 1 cup | Optional garnish |
The eggs are the foundation here, so freshness matters. Store-bought hard-boiled eggs work, but homemade yolks yield the smoothest texture—no graininess. For best results, use room-temperature eggs when separating yolks. The dark chocolate should be at least 70% cocoa for that deep, rich flavor. Ghirardelli or Lindt bars are reliable choices, but any high-quality brand works. The butter? Unsalted is a must—salted can alter the delicate balance of flavors in this delicate dessert.
No vanilla extract? Seeds from one vanilla bean work beautifully, or a dash of vanilla bean paste. The powdered sugar for dusting is optional but adds that restaurant-finish touch. For a lighter version, substitute half the heavy cream with whipped cream, though the texture will be slightly less stable. If you prefer a sweeter mousse, add an extra tablespoon of granulated sugar. The berries? Raspberries or strawberries add a bright contrast to the rich chocolate, but any fresh fruit works. Just avoid overly acidic fruits like citrus, which can cut through the chocolate flavor.
This mousse keeps beautifully in the fridge for up to 3 days, though it's best enjoyed within 24 hours for peak texture. For serving, chill individual portions for at least 2 hours before unmolding. The powdered sugar dusting should be done just before serving to prevent clumping. Store leftovers covered with plastic wrap pressed directly onto the surface to maintain moisture. Freezing isn't recommended as it alters the delicate texture.
Why You'll Love This Recipe
- No Egg Waste Ever: I peel those eggs for salads or snacks anyway—now they star in this dessert. That rich, creamy mousse gets its structure from the yolks, so you’re turning something you’d normally toss into something ridiculously good.
- Silky Smooth Magic: The sugar and butter melt into the chocolate while the whipped cream folds in light as air. Honestly, the texture is what makes this recipe—it’s not just chocolate mousse, it’s elegant chocolate mousse with a secret protein boost.
- Date Night Ready: Five ingredients, 20 minutes, zero fuss. Serve it in glasses with a sprinkle of sea salt for a restaurant-worthy dessert that still feels like you made it. (Yes, even on a Tuesday night.)
- Budget-Friendly Luxury: Dark chocolate bars and eggs are cheap staples, but this tastes like a gourmet treat. I’ll be real: I’ve made this for $3 a serving, and no one’s ever complained. (My wallet thanks me.)
Step-by-step instructions for hard-boiled egg chocolate mousse
A protein-rich twist on classic chocolate mousse—silky, decadent, and surprisingly balanced.
Hard-Boil the Eggs and Separate Yolks
Place the 4 whole large eggs in a saucepan and cover with cold water by about 1 inch. Bring to a boil over medium-high heat, then immediately remove from heat, cover, and let sit for 12 minutes. This timing ensures perfectly set yolks without turning them greenish. Drain and cool the eggs under cold running water for 5 minutes to stop cooking.
Once cool enough to handle, gently peel the eggs and separate the yolks from the whites. Discard the whites or save for another use. Transfer the yolks to a heatproof bowl—you'll need all 4 yolks for this recipe. The yolks should be smooth and free of any remaining white, which can prevent proper emulsification later.
Melt Chocolate and Butter for the Base
In a microwave-safe bowl, combine the 8 oz finely chopped dark chocolate bars and 2 tbsp unsalted butter. Microwave in 20-second intervals, stirring between each, until the chocolate is fully melted and smooth. The mixture should reach 110°F—just warm enough to blend but not so hot it cooks the egg yolks later.
Let the melted chocolate cool slightly for 2 minutes until it reaches 100°F. This prevents scrambling when you add the warm yolks. Stir in the 0.25 cup granulated sugar and 1 tsp vanilla extract until fully dissolved. The sugar will help balance the bitterness of the dark chocolate while adding subtle sweetness.
Temper the Egg Yolks for Silky Texture
In a separate bowl, whisk the 4 egg yolks vigorously until they pale slightly and thicken. Slowly pour the warm chocolate mixture into the yolks while whisking constantly. This gradual addition creates a stable emulsion—key for that velvety mousse texture. Whisk for 3-4 minutes until the mixture thickens and triples in volume.
Add the 0.125 tsp pinch of salt and continue whisking for another 2 minutes. The salt enhances the chocolate flavor and balances the sweetness. The mixture should now be thick but still pourable. If it looks too thin, whisk in 1 tsp more granulated sugar to help stabilize it.
Fold in Whipped Cream for Lightness
In a chilled mixing bowl, whip the 1 cup heavy whipping cream to soft peaks—when the whisk leaves a slight trail but the cream isn't fully stiff. This light texture prevents the mousse from becoming dense. Gently fold one-third of the whipped cream into the chocolate-yolk mixture to lighten it, then fold in the remaining cream until fully combined.
For a smooth finish, press the mousse through a fine-mesh sieve to remove any lumps. Transfer to serving glasses and refrigerate for at least 4 hours—or overnight for best results. The longer it chills, the more the flavors meld and the texture sets perfectly.
Serve with Garnish and Powdered Sugar
Before serving, dust each portion with 2 tbsp powdered sugar for a delicate finish. Top with 1 cup fresh berries, reserving a few for garnish. The berries add a bright contrast to the rich chocolate, while the powdered sugar gives a professional touch. Serve immediately or keep chilled until ready to enjoy.
The mousse should be light, airy, and melt in your mouth with a subtle protein boost from the egg yolks. Each bite delivers deep chocolate flavor without the heaviness of traditional mousse—proof that protein can be both functional and indulgent.
Pro Tips For Making Hard Boiled Egg Chocolate Mousse
- BOIL EGGS 9 MINUTES: Set a timer for exactly 9 minutes from cold water—no guessing. I learned this the hard way after peeling eggs that were either rubbery or still runny inside. Use an ice bath immediately after to stop cooking, or you’ll end up with overcooked yolks that turn to paste in your mousse.
- CHOP CHOCOLATE COLD: Freeze your dark chocolate bars for 10 minutes before chopping—it snaps cleanly instead of melting into a greasy mess. Trust me, this isn’t just about ease; melted chocolate in your prep bowl makes tempering the butter later a nightmare.
- WHISK CREAM FAST: Use a stand mixer and whip the heavy cream until it’s just stiff peaks, not dry. Overwhipping turns your mousse into butter, and you’ll end up with a dense, grainy texture. Stop when you can still see slight waves when you lift the whisk.
- MELT CHOCOLATE LOW: Heat the chopped chocolate and butter together over a double boiler at low heat—no microwave short cuts. I’ve ruined batches by rushing this, and you’ll know you’ve failed when your mousse looks streaky instead of silky. Stir constantly until it’s smooth, then let it cool slightly before mixing with the yolks.
Pro cooking tips for hard boiled egg chocolate mousse
Egg Yolk Emulsification
The key to silky texture lies in properly tempering the egg yolks with warm chocolate. I always whisk the yolks until they're pale and slightly thickened before slowly adding the chocolate mixture.
This gradual combination prevents scrambling and creates a stable emulsion. Work quickly but methodically—over-whisking can incorporate air and make the mousse too light. 💫
Chocolate Temperature Control
Melting chocolate too hot will cook the egg yolks when combined, resulting in a grainy texture. I melt chocolate to 110°F in 20-second microwave bursts, stirring between each, then let it cool to 100°F before mixing.
Use a candy thermometer for precision—this small temperature difference makes a huge impact on the final texture.
Whipping Cream Technique
For perfect lightness, whip the cream to soft peaks only—over-whipping creates butter. I fold in one-third of the whipped cream first to lighten the chocolate base before adding the rest.
Use a rubber spatula to gently fold, preserving as much air as possible. Chill your mixing bowl beforehand to help stabilize the cream.
Chilling Time Optimization
While the recipe calls for 4 hours of chilling, I've found that 6 hours yields even better texture and flavor integration. Place ramekins in the fridge uncovered for the first 2 hours to allow a thin skin to form, then cover.
This prevents surface drying while maintaining the signature velvety consistency.
Garnish Presentation Tips
For professional presentation, dust powdered sugar through a fine-mesh sieve just before serving to avoid clumping. I like to use a squeeze bottle for even distribution. Arrange berries in a circular pattern around the edge of the ramekin for visual appeal.
A few dark chocolate shavings add an elegant finishing touch that complements the rich flavor.
Troubleshooting Common Issues
If your mousse is too thick, whisk in 1 tbsp warm water to loosen it. For graininess, press the mixture through a fine-mesh sieve before chilling. If the texture is too light, reduce the whipped cream by ¼ cup next time.
Always ensure your eggs are fully cooked but not overdone—12 minutes is the sweet spot for perfectly set yolks.
Nutrition facts
Frequently asked questions
Why use hard-boiled eggs in chocolate mousse instead of raw yolks?
Hard-boiling ensures perfectly set yolks that won't scramble when combined with warm chocolate. The texture becomes silky and stable, while raw yolks risk breaking down during the melting process. Plus, pre-cooked eggs eliminate any risk of salmonella while maintaining that rich, protein-packed quality.
Can I make this mousse without eggs for a vegan version?
Yes! Replace the yolks with ¼ cup aquafaba (chickpea brine) or 2 tbsp cornstarch mixed with ¼ cup water. Whisk until thickened, then proceed with the recipe. The texture will be slightly denser but still delicious. For extra richness, add 2 tbsp melted coconut oil to the chocolate mixture.
How do I fix graininess in my mousse?
Press the mousse through a fine-mesh sieve before chilling to remove any lumps. If graininess persists, whisk in 1 tbsp warm water to loosen the texture. Always ensure your chocolate is fully melted and smooth before combining with yolks—uneven melting causes the most common graininess issues.
What's the best way to serve this mousse for a brunch menu?
Garnish with whipped cream and fresh berries for a breakfast-friendly presentation. Dust with cocoa powder instead of powdered sugar for a more mature flavor profile. Serve in small glasses with a mint leaf or edible gold leaf for an elegant touch. The protein boost makes it a satisfying way to start the day!
Can I make this ahead of time for a party?
Prepare the mousse up to 3 days ahead and store in an airtight container. For best texture, chill uncovered for the first 2 hours to form a skin, then cover. Bring to room temperature for 30 minutes** before serving to soften slightly. The flavors actually improve with time as the ingredients meld together.