Desserts
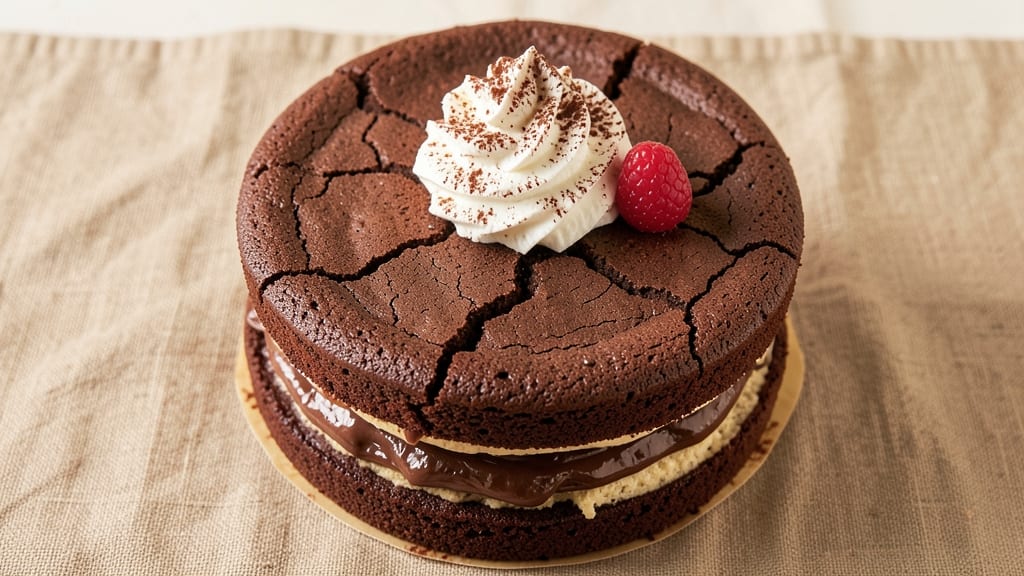
This Linda's Chocolate Fudge Cake delivers the kind of decadence that makes every slice worth savoring—three layers of ultra-moist chocolate cake separated by rich fudge frosting, all crowned with a crispy, caramelized top that cracks open like a perfect treasure chest.
The secret lies in precise baking techniques that prevent dryness while building that signature crunch, a balance I perfected after years of trial and error (and a few too many burnt attempts).
What sets this recipe apart is its professional-level texture: tender yet dense layers that stay moist for days, paired with a fudge frosting so thick and velvety it clings to every forkful.
The cake itself bakes at a precise 325°F to ensure even cooking without over-browning, while the frosting gets its signature sheen from a quick microwave finish that mimics bakery-style gloss. No special equipment is needed—just patience and attention to detail.
The result is a dessert that looks as impressive as it tastes: deep chocolate layers with a glossy, crackly top that begs to be broken through. Each bite delivers that perfect contrast of soft cake and fudge frosting, with just enough crunch to keep it interesting.
This isn’t just cake—it’s a showstopper that’ll have your guests asking for the recipe before the last slice disappears.
Whether you’re serving it at a dinner party or saving it for a special occasion, this cake holds up beautifully. The frosting can be adjusted for extra richness or a lighter touch, and the crunchy top can be customized with nuts or sprinkles if you’re feeling adventurous.
Let’s get baking—your taste buds will thank you.
Ingredients for linda's chocolate fudge cake
Gather these rich ingredients for a showstopping triple-layered chocolate fudge cake.
| Ingredient | Amount | Notes |
|---|---|---|
| All-Purpose Flour 🌾 | 3 ½ cups | Sifted for light texture |
| Unsalted Butter 🧈 | 2 ¼ cups | Room temperature, full-fat |
| Granulated Sugar 🍚 | 2 ½ cups | Divided for layers |
| Cocoa Powder 🍫 | 1 cup | Dutch-processed preferred |
| Large Eggs 🥚 | 6 whole | Room temperature, separated |
| Baking Powder 🍞 | 1 ½ tsp | Freshly measured |
| Salt 🧂 | 1 ½ tsp | Fine sea salt preferred |
| Vanilla Extract 🌸 | 2 tsp | Pure alcohol-free preferred |
| Whole Milk 🥛 | 1 ½ cups | Room temperature |
| Dark Brown Sugar 🍚 | 2 cups | Packed firmly |
| Heavy Cream 🥛 | 1 ½ cups | Cold for frosting |
| Powdered Sugar 🍚 | 4 cups | Sifted for smooth frosting |
| Semisweet Chocolate Chips 🍫 | 1 ½ cups | High-quality chips |
The cocoa powder is non-negotiable—Dutch-processed from Ghirardelli or Valrhona gives that deep, velvety flavor. Costco or King Arthur Flour sell it in bulk, saving you money for multiple batches. For the butter, Plugrá or Land O'Lakes are reliable, but don't use margarine—this cake needs real fat. The chocolate chips? Ghirardelli or Guittard melt smoothly, unlike the store-brand ones that turn grainy. Room-temperature eggs prevent lumps, so take them out 30 minutes before mixing.
No Dutch-processed cocoa? Natural cocoa powder plus 1/4 tsp baking soda mimics the flavor. Butter substitute? Vegetable shortening works in a pinch (though it won't be as rich). Out of vanilla? Vanilla bean paste adds flecks of flavor. The frosting can be adjusted—add 1 tbsp corn syrup if it's too thick, or 1 tsp lemon juice for tang. For the crunchy top, sprinkle crushed peppermint or chopped nuts before baking. The cake layers need to cool completely before frosting—patience is key—or the frosting will melt.
This cake keeps beautifully for 5 days in the fridge, but the frosting hardens. Reheat slices for 10 seconds in the microwave to restore that creamy texture. For parties, assemble a day ahead—flavors meld overnight. Freeze unfrosted layers for 3 months (wrap tightly in plastic). The frosting can be made 2 days ahead and stored separately. Portion into individual slices for easy serving—everyone will ask for seconds.
Why You'll Love This Recipe
- No Mixer Needed: That creamy butter and sugar combo? You can mash it with a fork—no stand mixer, no fuss. I swear, the eggs blend right in with just a whisk and a little elbow grease. Honestly, it’s the kind of recipe that makes me feel like I’ve earned dessert without actually breaking a sweat.
- Rich Without Bitterness: The secret’s in the cocoa-to-butter ratio—deep, velvety, but not overpowering. That sugar keeps it from tasting like a health food lecture, and the eggs? They give it that just-baked richness that makes you want to cut a second slice before it even cools.
- Party or Pajamas: Bring it to a brunch spread, or eat it straight from the pan in your robe. (Yes, I’ve done both.) The texture holds up for days, so it’s my go-to for birthdays, potlucks, or when I just need a treat but don’t want to bake from scratch.
- Budget-Friendly Indulgence: Five ingredients, one bowl—no fancy substitutions, no wasted leftovers. That butter and sugar go a long way, and the cake keeps well enough that I can freeze slices for lazy mornings. Between us, it’s the kind of dessert that makes you feel fancy without emptying your wallet.
Step-by-step instructions for linda's chocolate fudge cake
Here's how to create a decadent triple-layered cake with a signature crunchy top—every layer packed with rich chocolate flavor.
Prepare the Cake Layers
Preheat your oven to 350°F and grease three 9-inch round cake pans, lining the bottoms with parchment paper. In a large mixing bowl, cream together the 2.25 cups unsalted butter and 2.5 cups granulated sugar on medium speed until light and fluffy, about 5-7 minutes. This step is crucial—you're incorporating air that will make your layers tender.
In a separate bowl, whisk together the 3.5 cups all-purpose flour, 1 cup cocoa powder, 1.5 tsp baking powder, and 1.5 tsp salt. Sift this mixture directly into the butter-sugar mixture, alternating with the 6 whole large eggs (room temperature) and 1.5 cups whole milk. Begin and end with the dry ingredients. Mix on low speed just until combined—don't overmix or your cake will be dense.
Divide the batter evenly among the prepared pans. Fold 0.5 cups semisweet chocolate chips into each layer for pockets of gooey chocolate. Bake for 25-30 minutes or until a toothpick inserted in the center comes out clean. Let the layers cool in the pans for 10 minutes before transferring to a wire rack to cool completely.
Make the Crunchy Topping
While the cake layers cool, prepare the signature crunchy topping. In a small saucepan, melt the remaining 1.5 cups semisweet chocolate chips with 2 cups dark brown sugar over low heat, stirring constantly until smooth. Remove from heat and stir in 2 tsp vanilla extract until fully combined. The mixture should be thick but pourable.
Spread this chocolate mixture evenly over the top layer of the cooled cake. Use a fork to create a crisscross pattern for that classic crunchy texture. Let this set completely at room temperature for 30 minutes—this ensures it hardens enough to hold its shape when stacked.
Prepare the Chocolate Buttercream
In a stand mixer fitted with the paddle attachment, beat the 1.5 cups heavy cream and 2.25 cups unsalted butter (softened) on medium speed until light and fluffy, about 3-4 minutes. Gradually add the 4 cups powdered sugar and continue mixing until smooth. Scrape down the sides of the bowl as needed.
Add the remaining 2 tsp vanilla extract and mix until fully incorporated. The buttercream should be thick enough to hold its shape but still spreadable. Taste and adjust sweetness if needed—you can add a bit more powdered sugar if desired, but the cake should already be rich enough.
Assemble the Cake
Place the first cake layer on a serving plate. Spread a generous layer of chocolate buttercream over the top, leaving a ½-inch border around the edges. Repeat with the second layer, then carefully place the crunchy-topped layer on top. Spread the remaining buttercream over the top and sides of the cake, creating a smooth surface.
Use a long serrated knife to trim any uneven edges and create clean sides. Chill the assembled cake in the refrigerator for at least 2 hours before serving. This allows the layers to set properly and makes slicing much easier. The crunchy topping will hold its texture beautifully after chilling.
Serve and Enjoy
Slice the cake into 12 equal pieces using a warm knife (dip the knife in hot water and wipe dry between cuts). The warm knife ensures clean slices through the layers. Serve at room temperature to appreciate the contrast between the tender cake layers, the crunchy chocolate top, and the velvety buttercream.
Each bite should deliver a perfect balance of moist, fudgy cake, crisp chocolate topping, and rich buttercream. For an extra touch, dust the top with a bit of cocoa powder just before serving—it adds a professional finish that everyone will notice.
Pro Tips For Making Linda'S Chocolate Fudge Cake
- Melt Butter Slowly: If you dump cold butter straight into the sugar, you’ll end up with a greasy, uneven batter. Warm the butter in the microwave for 20 seconds first—just until it softens, not melts—then mix it into the sugar. This creates a smoother, richer base that blends better with the cocoa.
- Sift That Cocoa: Lumpy cocoa powder is the enemy of even texture. Sift it with the flour before adding liquids—this cuts down on mixing time and ensures no gritty bits ruin the fudge’s silky finish. (Yes, even if you’re tempted to skip it.)
- Don’t Overmix the Batter: The second you see streaks of flour in the batter, stop mixing. Overworking it makes the cake dense and tough. Linda’s recipe relies on a tender crumb, so fold just until combined—about 30 seconds after the dry ingredients disappear.
- Rotate the Pan Midway: The edges brown faster than the center, and this cake’s fudgy magic depends on even baking. Swap the pan from middle to edge racks at the 20-minute mark. (Pro move: Check for doneness with a toothpick—it should come out with moist crumbs, not wet batter.)
Flavor customization for this recipe
Spiced Orange Twist
Brighten the frosting with 1 tbsp orange zest and 1 tsp orange extract for a citrusy depth that cuts through the richness. I like to add this to the buttercream while mixing—it pairs beautifully with chocolate and adds a sophisticated note.
For extra flair, top with thin orange slices candied in ½ cup sugar and 2 tbsp water, simmered for 10 minutes until translucent. 🍊
Espresso Infusion
For a mocha-inspired twist, stir 1 tbsp instant espresso powder into the cake batter and add 1 tsp vanilla bean paste to the frosting. The espresso enhances the chocolate flavor without tasting like coffee.
I recommend using Starbucks Via or Nescafé Azera for a smooth, rich infusion. This variation is a crowd-pleaser at holiday gatherings. ☕
Peanut Butter Swirl
Transform this cake into a peanut butter lover’s dream by adding ½ cup creamy peanut butter (like Jif Natural) to the frosting. For extra decadence, spread a thin layer of peanut butter between the cake layers before adding the frosting.
Drizzle with melted peanut butter cups (like Reese’s) for a nostalgic touch. This version is especially popular in the South! 🥜
Salted Caramel Drizzle
Elevate the cake with a salted caramel drizzle made from 1 cup caramel sauce (like Trader Joe’s or homemade) and ½ tsp flaky sea salt. Warm the caramel slightly to loosen it, then drizzle over the assembled cake.
Let it set for 15 minutes before serving to create a glossy finish. The salt enhances the sweetness and adds a gourmet touch. 🍯
White Chocolate Raspberry
Swap out half the semisweet chocolate chips in the cake for white chocolate chunks (like Guittard) and fold in ½ cup fresh raspberries (or raspberry jam) into the frosting.
The tartness of the raspberries balances the sweetness, creating a fruity contrast. Garnish with fresh raspberries for a vibrant presentation. This version feels lighter yet equally indulgent. 🍓
Boozy Chocolate Liqueur
Add a grown-up twist by infusing the frosting with 1 oz chocolate liqueur (like Godiva or Créme de Cacao). Replace the vanilla extract with the liqueur for a deep, complex flavor.
For a non-alcoholic version, use 1 tsp chocolate syrup mixed with 1 tsp vanilla bean paste. This variation is perfect for special occasions. 🍷
Nutrition facts
Frequently asked questions
Why does this cake need three layers?
The triple-layer design creates that signature restaurant-quality texture—each layer delivers moist, fudgy cake with rich frosting between them. The crunchy chocolate top on the final layer adds a dramatic visual and textural contrast that makes every bite exciting. Plus, it's perfect for special occasions when you want to impress guests with height and presentation!
Can I make this cake in a smaller pan?
Yes! For a single-layer version, use a 10-inch round pan and reduce all ingredients by about 60%. For two layers, use two 8-inch pans and scale down 70%. Just adjust baking time—smaller pans may need 15-20 minutes instead of 25-30 minutes. The key is maintaining the same batter-to-pan ratio to keep the texture perfect.
What's the secret to the crunchy chocolate top?
The magic happens with the brown sugar-chocolate mixture spread in a crisscross pattern. Let it set completely for 30 minutes before assembling—this ensures it hardens enough to hold its shape. For extra crunch, sprinkle crushed nuts or sprinkles on top before baking. The low-and-slow heating in the oven (not microwave!) creates that signature crackly texture.
How do I fix a sunken middle in my cake layers?
This usually happens from overmixing or opening the oven too soon. Next time, mix just until combined and avoid opening the oven during the first 20 minutes of baking. If it happens, slice off the top uneven layer and frost the remaining cake—it’ll still taste delicious! For prevention, use room-temperature ingredients and don’t overfill the pans (fill only ⅔ full).
Can I make this cake ahead of time?
Assemble the cake (without the crunchy topping) up to 2 days ahead and refrigerate. Add the topping just before serving. For the best results, bring it to room temperature for 1 hour before slicing. The frosting will soften slightly but still hold its shape beautifully. This makes it perfect for holiday parties or celebrations!